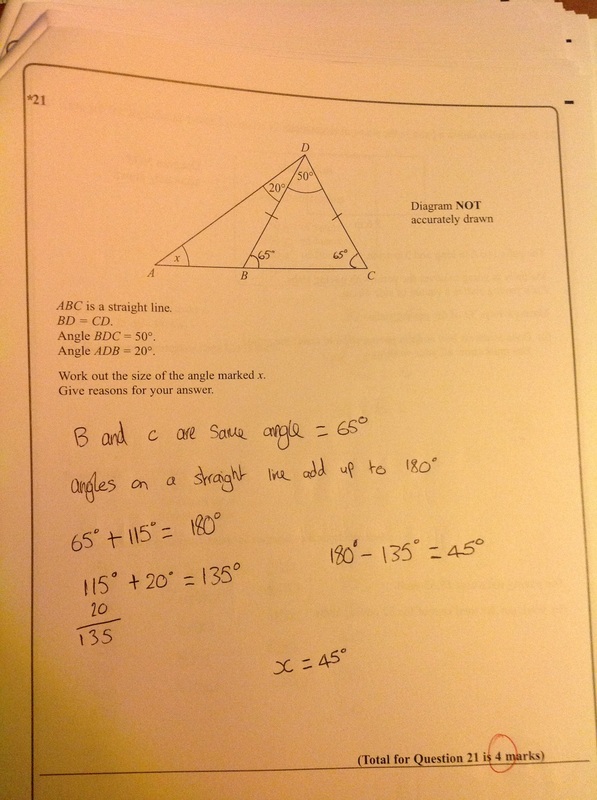
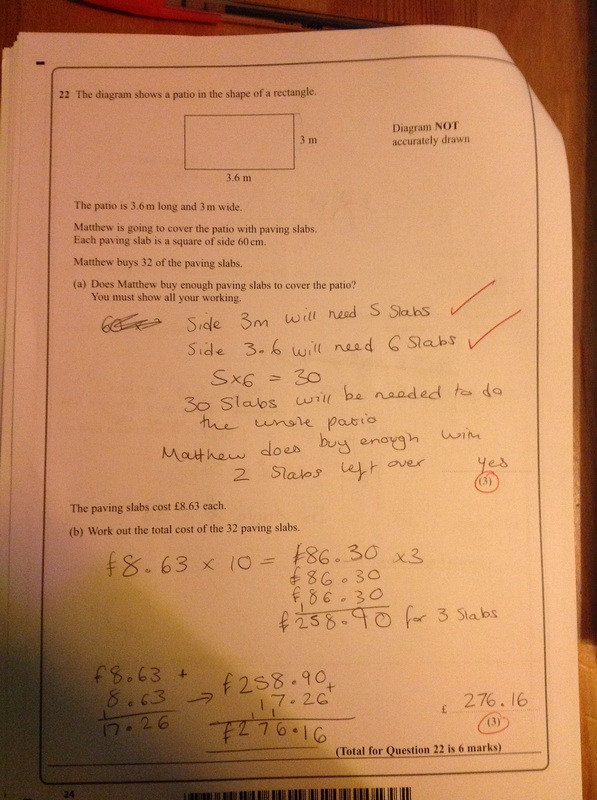
To allow pupils time to review mock papers at home, using their own work as feedback we have posted a 'best example' exam paper on our class blog. A photo of every question - using the best answers from within the class - it gives pupils an opportunity to mark their work against that of their peers. I have included two of the pages as an example, we use the entire paper on our blog.
0 Comments
Resources used with a mixed ability year 11 (Grade low E to high B) - all working towards securing a C.
Grade E to B
Linking together resources from TES.
This is my first key note presentation (also copied as a powerpoint) and my first step towards remote control of my board through my ipad. To get around a lack of Apple TV I have installed AirServer on my laptop (you can also use Reflection but I found this to be really clunky on my machine). With my laptop hard wired to the projector I can now run my lesson from my ipad anywhere in the room by mirroring my ipad through the wifi. The big plus is I can flick between video clips/ internet/ apps/ presentation at will. Be anywhere in the room but still push the lesson on when needed and with Keynote my board shows the presentation while my ipad shows all the notes I have put with each slide, this means I can prep my essential questions/ key points not to miss etc and see the little reminders you miss when your normally in full flow. Home testing is really positive. School wifi offers its own challenges.
Using steps to scaffold learning. The step The reason why The hint Space for reflection This is a first draft at using this particular structure (including a reason and a hint). The lesson is an adaptation of Don Steward's work.
While researching for this I found this resource which is freely available on the TES website, I have included it here as I think it's structure is brilliant.
This is a revision lesson for a year 11 group (foundation). The content in the flipchart is very basic and only as a reference to some questions that we might practise. The important part of the lesson rests in the starting/ closing review document. At the start of the lesson pupils will complete the questions in the before column and we will share answers (but not necessarily correct as I want pupils to discover the correct answers for themselves). Responses to this activity will guide where the lesson goes. At the close of the lesson pupils will complete the same questions in the after column, it is here we will review and pupils will clearly be able to see the progress they have made.
Following on from the previous lesson - 3d drawing to lead into surface area. Sticking to the skilled steps. Lesson developed from feedback of the pupils who said they liked the structure and clarity of direction of the previous lesson.
A lesson I planned for pupils currently at grade G to F. It isn't a lights and bells exciting lesson and, while I prefer to teach with them, it doesn't have rich investigations. Mostly because I barely know the class, they currently have a very low threshold for resiliance and little confidence in their own ability. Match this with an exam looming in November and this is what I ended up with. It does break down the topic skill by skill and lets the pupils see exactly what they need to do to get to the next grade with plenty of review opportunities after each step. I started with a game of squares (sneaking in negative numbers), we completed the lesson up to the triangle demonstration which everyone completed using a piece of A4. I was surprised at how taken impressed some of the pupils were that the two cut pieces fitted exactly on top of the triangle. Next lesson we will start with a bit of 3D drawing on isometric paper (drawing small shapes made of blocks) which will give us a lead in to surface area (I hope)
The purpose of this lesson is to decide with the class which topics they need to cover. The questions are taken directly from the EDEXCEL June 2012 (1MAO) paper.To avoid confidence issues and to allow the pupils time to discuss the questions I have deliberately left them out and just shown the diagram or table that builds the context. We can then build a bank of 'things we know', and possibly extend this with 'things we wonder'. I find pupils that struggle with maths rarely read exam questions properly and tend to rush as quickly as possible to any sort of answer to get the work out of the way. This will force pupils to discuss the context before being allowed to see the question, which is a skill they need to develop. Once this is done pupils will write their own 3 questions, I will encourage some to write questions that build in complexity and/or to give the marks they think their questions are worth. I may get them to compare their questions in groups and choose one to present to the class (or write on the board). We will then attempt to answer these questions. After this we will look at the actual question and compare it to the ones we produced. We may then review the marks given and, provided we haven't already done it, complete the question. I have chosen 6 topics but may cut this short if time runs out or the task becomes repetitive. To review, each pupil will write their name on 3 post it notes and stick them under the three topics they would like to cover in class. This will be my next run of lessons. Once completed the the cycle will repeat again (depending on the feedback I get from the class about this one). The initial page is to establish that we can draw a lot of information out of one image, I have chosen a topic that will generate some interest and which everyone will be able to comment on without any maths anxiety.
I changed the format of this lesson at the last minute to match the identifying topics lesson as it went so well. Pupils did write down what they know about each quesion by looking at the pictures but we followed this by sorting the topics (red/amber/green). The red topics then became the next two lessons. The first being Area and Perimeter.
|